Sponge Garden Hands-On Experiments
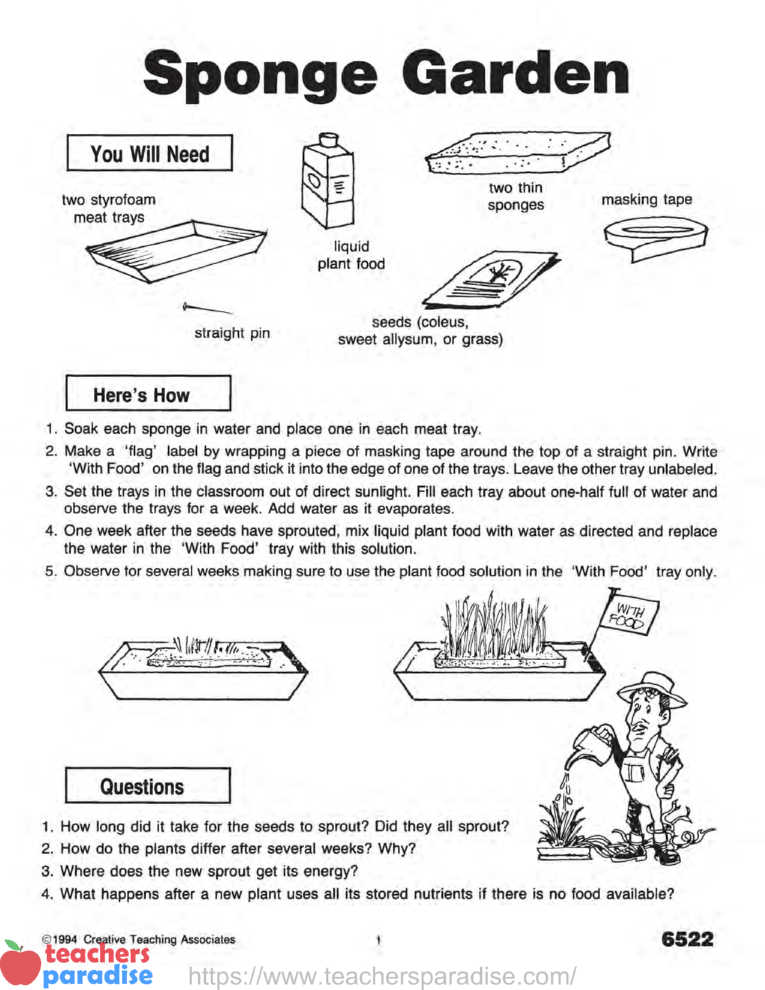
- Soak each sponge in water and place one in each meat tray.
- Make a ‘flag’ label by wrapping a piece of masking tape around the top of a straight pin. Write
‘With Food’ on the flag and stick it into the edge of one of the trays. Leave the other tray unlabeled. - Set the trays in the classroom out of direct sunlight. Fill each tray about one-half full of water and observe the trays for a week. Add water as it evaporates.
- One week after the seeds have sprouted, mix liquid plant food with water as directed and replace the water in the ‘With Food’ tray with this solution.
- Observe for several weeks making sure to use the plant food solution in the ‘With Food’ tray only.
Questions
- How long did it take for the seeds to sprout? Did they all sprout?
- How do the plants differ after several weeks? Why?
- Where does the new sprout get its energy?
- What happens after a new plant uses all its stored nutrients if there is no food available?

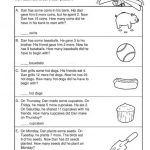
WORKSHEET & Sample PDF Activity
Sample PDF Activity
Sponge Garden
GENERAL INFORMATION
Seeds contain the embryo and stored food of a plant encased in a hard shell or other protective coating. Seeds are produced by both angiosperms (flowering plants) and gymnosperms (non-flowering plants and trees). The largest seed is that of the double coconut tree which can weigh up to 50 lbs. while the smallest seeds are almost invisible to the naked eye. Some plants produce only a few seeds at a time while other plants, like pigweed, produce millions.
Flowering angiosperms produce .enclosed seeds that are covered by fleshy fruits, dry pods, or hard kernels. Gymnosperms produce naked seeds enclosed in cones. The scales of the cones provide protection for the seeds while they are developing. Some naked seeds, like pine nuts, are enclosed in a protective shell.
Seeds have three parts: embryo, food storage tissue, and seed coat. The seed coat protects the seed from injury during development. The food storage unit of angiosperms is called the endosperm. Gymnosperms contain megagametophyte food storage tissue. The tissue that eventually develops into the mature plant is stored in the embryo.
MATERIALS
You will need two styrofoam meat trays or other flat containers, two thin (about 1 inch thick when wet) sponges, liquid plant food, packet of seeds, a straight pin, and masking tape.
PROCEDURE
Follow the procedure as outlined on the student worksheet. Be sure that the sponges stay moist all the way through to ensure germination and continued growth. You may want to have the students count the seeds before and after sprouting to determine the percent of germination.
ANSWERS TO QUESTIONS
- The sprouting time Will vary with room temperature. The warmer the temperature, the faster the seeds will sprout.
- The unfed plants will begin to die, even with adequate water, because the food and nutrients stored in the seed are gradually used up. The fed plants will flourish longer because they will have the nutrients to make more food through photosynthesis.
- A new sprout gets its energy from the food stored in the seed.
- A plant will die if no nutrients are provided after the stored food is used up.
EXTENSION IDEAS
- SEED STRUCTURE
The structure of a seed can be observed by soaking 8-10 pinto beans in water overnight and dissecting them. Place the beans in the refrigerator in a jar with enough water to cover them completely. Drain the beans on a paper towel. Peel the coat from a bean and split the bean open on the rounded side opposite the hilum. If you are very careful you can see the ‘baby bean plant’ inside. Keep trying until you expose a baby bean. Identify the cotyledon (food), radicle (future root), hypocotyl (future stem), and epicotyl (future leaf) of the bean interior. Use a dry bean to identify the seed coat, hilum, and micropyle. Use the encyclopedia to identify these structures. - GROW PLANTS FROM POTATOES
Put several potatoes in a dark place for several days, checking every few days for the small white growths called eyes. Cut a chunk out of the potato around the eye and bury it in a jar filled with potting soil (with the eye pointing up) so that the eye is about two inches deep. Keep the soil moist, not soaking wet. It will take about two weeks for a potato stem to show above the soil.
Discuss two forms of plant propagation: tubers and cuttings. Propagation is the ability of a plant to form new plants from parts of the existing plant. Have a student research plant propagation and place the report in your science center along with the potato plant and sponge garden.
Table of Contents Life Science – Biology – REM6527
Sponge Garden 1 – 2
Students will discover that plants need an outside source of nutrition once the stored food in the seed is used up.
Celery Fun 3- 4
Students will discover that plants carry water through tubes in the stems called xylem.
Upside Down? 5 – 6
Students will discover that plant roots will grow down and plant stems grow up, regardless of the placement of the seed.
Salad Houseplants 7 – 8
Students will observe the germination of a seed and growth of a plant using anavocado pit.
Acid or Base? 9-10
Students will create a litmus substitute with cabbage juice and demonstrate its ability to indicate the relative acidic or basic nature of a solution.
Soda Fountain 11 – 12
Students will create and observe an acid/base neutralization reaction. They will discover that carbon dioxide gas formation is one result of this reaction.
Model Cell 13- 14
Students will create a model representing an animal cell and demonstrate the semipermeable nature of the cell membrane and the role it plays in the osmosis of water through the cell.
Fungus Among Us 15 – 16
Students will discover that yeast feeds on sugar and that carbon dioxide gas formation is a result of this action.
Wash Your Hands! 17- 18
Students will discover that the bacterial contamination of food can be reduced by good hand washing technique.
Starch Test 19 – 20
Students will test food samples for starch using iodine as an indicator.
Fat Test 21 – 22
Students will test food samples for the presence of fat.
Making Butter 23 – 24
Students will mechanically separate butterfat from buttermilk.
Make Your Own Glue 25- 26
Students will discover that flour and milk contain substances that can be used to create adhesive glues.
Gum Drop Fun 27 – 28
Students will create gum drops and understand the gel-matrix nature of gelatin.
Sugar Secret Code 29 – 30
Students will create a secret message using sugar-water ink and understand that a change in the carbon due to heat causes the darkening of the ink.